Master Guide: How to Replace Bathtub Faucet Stem Like a Pro
Is your bathtub faucet dripping incessantly, turning your relaxing bath into a frustrating water-wasting ordeal? A worn-out faucet stem is often the culprit, and fortunately, learning how to replace bathtub faucet stem is a DIY project well within reach for most homeowners. This comprehensive guide will equip you with the knowledge and confidence to tackle this task like a seasoned plumber, saving you money and the hassle of calling for professional help. We’ll go beyond the basics, diving deep into the different types of stems, identifying the right replacement, and mastering the step-by-step process. Our aim is to provide you with an unparalleled resource, backed by expert insights and practical tips, ensuring a successful and leak-free repair.
Understanding Bathtub Faucet Stems: A Deep Dive
At the heart of your bathtub faucet lies the stem, a critical component responsible for controlling the flow of water. It’s essentially a valve that opens and closes, allowing water to pass through the faucet when you turn the handle. But what exactly is a faucet stem, and why does it fail? Let’s explore the nuances.
A faucet stem, also known as a valve stem, is a cylindrical piece typically made of brass or plastic. It houses a series of washers, O-rings, and threads that work together to create a watertight seal. Over time, these components can wear down due to constant use, mineral buildup from hard water, and the corrosive effects of chemicals in the water supply. This wear and tear leads to leaks, drips, and difficulty in controlling water temperature.
There are several types of bathtub faucet stems, each with its own design and characteristics. Compression stems, ball stems, cartridge stems, and ceramic disc stems are the most common. Compression stems are the oldest and simplest type, relying on a rubber washer to seal against the valve seat. Ball stems use a rotating ball with openings that align with the water inlets. Cartridge stems contain a self-contained cartridge that moves up and down to control the water flow. Ceramic disc stems are the most modern and durable, using two ceramic discs that slide against each other to regulate water flow.
Knowing the type of stem in your faucet is crucial for selecting the correct replacement. Incorrect replacements can lead to leaks, damage to the faucet body, or even water damage in your bathroom. Identifying the stem type may require disassembly of the faucet, so be prepared to carefully examine the internal components.
Essential Tools and Materials for Bathtub Faucet Stem Replacement
Before you embark on your bathtub faucet stem replacement journey, gather the necessary tools and materials. Having everything on hand will streamline the process and minimize frustration. Here’s a comprehensive checklist:
- New Faucet Stem(s): The most critical item. Ensure it’s the correct type and size for your faucet. Take the old stem to the hardware store for comparison or consult your faucet’s manual.
- Adjustable Wrench: For loosening and tightening nuts and connections.
- Penetrating Oil: To loosen stubborn, corroded parts.
- Screwdrivers (Phillips and Flathead): For removing handles and accessing the stem.
- Pliers: For gripping and manipulating small parts.
- Faucet Stem Puller (Optional but Recommended): This tool is designed to extract stuck stems without damaging the faucet body.
- Seat Wrench (Optional): For removing and replacing the valve seat (the part the stem seals against).
- Plumber’s Grease: To lubricate new washers and O-rings for a better seal.
- Clean Rags or Towels: To wipe up spills and protect surfaces.
- Bucket: To catch any remaining water in the pipes.
- Flashlight or Headlamp: To illuminate the work area.
- Safety Glasses: To protect your eyes from debris.
Having these tools and materials readily available will ensure a smooth and efficient faucet stem replacement.
Step-by-Step Guide: How to Replace Bathtub Faucet Stem
Now, let’s get down to the nitty-gritty of how to replace bathtub faucet stem. Follow these detailed steps carefully to ensure a successful outcome:
- Turn Off the Water Supply: This is the most crucial step. Locate the shut-off valves for your bathtub faucet, usually located under the sink or in an access panel behind the tub. Turn them clockwise until they are completely closed. If you can’t find individual shut-off valves, turn off the main water supply to your house.
- Protect the Tub: Place a towel or drop cloth in the bathtub to prevent scratches or damage from dropped tools.
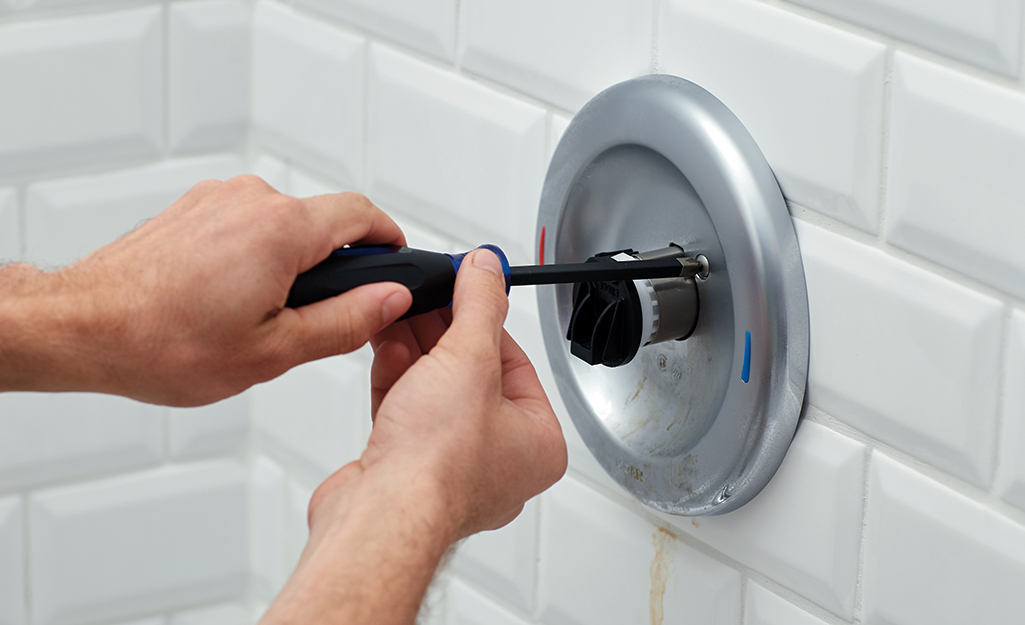
- Remove the Faucet Handle: Depending on the faucet design, you may need to pry off a decorative cap to access the handle screw. Use a screwdriver to remove the screw and then gently pull the handle off the stem.
- Remove the Escutcheon (If Applicable): The escutcheon is the decorative plate that covers the faucet body. It may be held in place by screws or simply snap into place. Remove it carefully to avoid damaging the surrounding tile or wall.
- Loosen the Stem Nut: Use an adjustable wrench to loosen the nut that holds the faucet stem in place. Be careful not to overtighten or strip the nut. If the nut is corroded or stuck, apply penetrating oil and let it sit for a few minutes before attempting to loosen it again.
- Remove the Faucet Stem: Once the nut is loosened, you should be able to pull the faucet stem out of the faucet body. If the stem is stuck, use a faucet stem puller to extract it.
- Examine the Old Stem: Carefully inspect the old stem for signs of wear and tear, such as worn washers, cracked O-rings, or corroded threads. This will help you confirm that the stem was indeed the source of the leak.
- Install the New Faucet Stem: Apply a thin coat of plumber’s grease to the new washers and O-rings on the new faucet stem. This will help create a better seal and prevent future leaks. Insert the new stem into the faucet body and tighten the stem nut with an adjustable wrench. Be careful not to overtighten.
- Reassemble the Faucet: Replace the escutcheon (if applicable) and reattach the faucet handle. Tighten the handle screw securely.
- Turn on the Water Supply: Slowly turn on the water supply to the bathtub faucet. Check for leaks around the stem nut and handle. If you see any leaks, tighten the nut or handle screw slightly.
- Test the Faucet: Turn the faucet on and off and check the water temperature. Make sure the faucet is functioning properly and that there are no drips or leaks.
By following these steps meticulously, you can successfully replace your bathtub faucet stem and restore your faucet to its former glory.
Troubleshooting Common Problems During Bathtub Faucet Stem Replacement
Even with careful planning and execution, you might encounter some challenges during the faucet stem replacement process. Here are some common problems and their solutions:
- Stuck Faucet Stem: If the stem is stuck and won’t budge, apply penetrating oil and let it sit for a while. You can also try using a faucet stem puller.
- Stripped Stem Nut: If you strip the stem nut, you may need to use a nut splitter to remove it. Alternatively, you can try using a pipe wrench to grip the nut.
- Leaking After Replacement: If the faucet is still leaking after you replace the stem, double-check that you have the correct stem and that the washers and O-rings are properly seated. You may also need to replace the valve seat.
- Difficulty Identifying the Stem Type: If you’re unsure about the type of stem in your faucet, take the old stem to a plumbing supply store or hardware store for assistance.
Addressing these common issues proactively can save you time and frustration during the repair process. Remember to consult with a plumbing professional if you encounter problems beyond your expertise.
Choosing the Right Replacement Bathtub Faucet Stem: A Buyer’s Guide
Selecting the correct replacement faucet stem is paramount to a successful repair. Here’s what to consider:
- Stem Type: As discussed earlier, identify the type of stem in your faucet (compression, ball, cartridge, or ceramic disc).
- Stem Length and Diameter: Measure the length and diameter of the old stem to ensure the new one is the same size.
- Thread Size and Pitch: Match the thread size and pitch of the old stem to the new one.
- Brand and Model: If possible, identify the brand and model of your faucet. This will make it easier to find a compatible replacement stem.
- Material: Choose a stem made of high-quality materials, such as brass or durable plastic, for longevity.
Consider purchasing stems from reputable brands known for their quality and durability. Reading customer reviews can also provide valuable insights into the performance and reliability of different stem options. Investing in a high-quality stem will save you money and hassle in the long run.
Maintaining Your Bathtub Faucet Stems for Longevity
Preventative maintenance can significantly extend the lifespan of your bathtub faucet stems and prevent future leaks. Here are some simple tips:
- Avoid Over-Tightening: Over-tightening the faucet handles can damage the stems and washers.
- Use a Water Softener: If you have hard water, consider installing a water softener to reduce mineral buildup on the stems.
- Lubricate Regularly: Apply a thin coat of plumber’s grease to the stems periodically to keep them lubricated and prevent corrosion.
- Replace Worn Washers and O-rings: Replace worn washers and O-rings promptly to prevent leaks.
- Flush the Faucet: Flush the faucet regularly to remove any debris or sediment that may have accumulated.
By incorporating these maintenance practices into your routine, you can minimize wear and tear on your faucet stems and ensure years of trouble-free operation.
The Economic and Environmental Benefits of Fixing a Leaky Faucet
Addressing a leaky faucet goes beyond mere convenience; it offers significant economic and environmental advantages. A dripping faucet can waste gallons of water over time, leading to higher water bills. According to the EPA, a leaky faucet that drips at a rate of one drip per second can waste more than 3,000 gallons of water per year.
By repairing your leaky faucet, you’re not only saving money on your water bill but also conserving a precious natural resource. Water conservation is crucial in many parts of the world, and even small efforts can make a big difference. Furthermore, reducing water waste helps lower energy consumption, as less water needs to be treated and pumped.
Choosing to repair your faucet stem instead of replacing the entire faucet also reduces waste and minimizes your environmental footprint. By extending the life of your existing fixtures, you’re contributing to a more sustainable lifestyle.
Expert Perspective: When to Call a Plumber
While replacing a bathtub faucet stem is a manageable DIY project for many, there are situations where calling a licensed plumber is the wiser choice. If you’re uncomfortable working with plumbing, if you encounter significant challenges during the repair process, or if you suspect underlying plumbing issues, it’s best to seek professional help.
Plumbers have the expertise and tools to diagnose and resolve complex plumbing problems efficiently and effectively. They can also ensure that the repair is done correctly and up to code. Furthermore, they can identify potential issues that you might miss, preventing future problems and costly repairs.
Replacing Your Bathtub Faucet Stem: A Worthwhile Investment
Mastering how to replace bathtub faucet stem is a valuable skill that empowers you to maintain your home and save money. By following this comprehensive guide, you can confidently tackle this DIY project and restore your faucet to its optimal functionality. Remember to prioritize safety, take your time, and consult with a professional if needed. Taking action now will save water, money, and frustration in the long run.
Now that you’ve learned how to replace your bathtub faucet stem, why not share your experience in the comments below? Your insights can help others confidently tackle this common home repair!
