DIY Concrete Wood Floors: Achieve the Look of Hardwood with Concrete
Want the warmth and beauty of hardwood floors without the cost and maintenance? Concrete wood floors offer a stunning alternative, allowing you to create a durable, unique, and stylish surface yourself. This comprehensive guide will walk you through every step of the concrete wood floors diy process, from surface preparation to the final sealing, providing you with the knowledge and confidence to transform your space. We’ll cover techniques, materials, and expert tips to ensure a professional-looking result that will enhance your home’s value and appeal. Whether you’re a seasoned DIY enthusiast or a complete beginner, this guide will empower you to create beautiful and long-lasting concrete wood floors.
Understanding the Appeal of Concrete Wood Floors
Concrete wood floors have surged in popularity in recent years, and for good reason. They offer a unique combination of aesthetic appeal, durability, and cost-effectiveness. Unlike traditional hardwood, concrete is incredibly resistant to scratches, dents, and moisture, making it ideal for high-traffic areas and homes with pets or children. The versatility of concrete allows for a wide range of design options, from rustic and reclaimed looks to sleek and modern styles. The ability to stain, texture, and stamp concrete to mimic the appearance of real wood opens up a world of creative possibilities, allowing you to customize your floors to perfectly match your personal style. Furthermore, concrete is an environmentally friendly option, especially when utilizing existing concrete slabs, reducing the need for new materials.
Essential Tools and Materials for Your Concrete Wood Floor Project
Before embarking on your concrete wood floors diy adventure, it’s crucial to gather all the necessary tools and materials. Having everything on hand will streamline the process and minimize delays. Here’s a comprehensive list:
- Concrete Mix: Choose a high-quality concrete mix specifically designed for flooring applications. Consider self-leveling concrete for a smoother base.
- Wood Grain Stamps or Stencils: These are essential for creating the wood grain texture. Select stamps or stencils that match your desired wood species and grain pattern.
- Release Agent: A liquid or powder release agent prevents the stamps from sticking to the concrete.
- Concrete Stain: Choose a stain color that replicates the natural wood tone you’re aiming for. Consider using multiple stain colors for a more realistic effect.
- Concrete Sealer: A high-quality sealer protects the concrete from stains, moisture, and wear. Choose a sealer that is compatible with your stain and intended for interior use.
- Trowel: For smoothing and leveling the concrete.
- Spreader: For evenly distributing the concrete mix.
- Mixing Tools: A concrete mixer or a large bucket and mixing paddle.
- Measuring Tools: A measuring tape, level, and square.
- Safety Gear: Gloves, safety glasses, and a dust mask.
- Optional Tools: Concrete grinder (for surface preparation), concrete saw (for creating expansion joints), and a wet/dry vacuum.
Preparing Your Concrete Slab: The Foundation for Success
Proper preparation is paramount to achieving a professional-looking concrete wood floors diy project. This involves cleaning, repairing, and leveling the existing concrete slab. Start by thoroughly cleaning the surface to remove any dirt, dust, grease, or debris. Use a concrete cleaner and a scrub brush to ensure a pristine surface. Next, inspect the slab for any cracks or imperfections. Fill any cracks with a concrete crack filler and allow it to cure completely. If the slab is uneven, you may need to apply a self-leveling concrete compound to create a smooth and level base. This step is crucial for ensuring that the wood grain stamps or stencils create a uniform and consistent texture. Finally, lightly grind the surface with a concrete grinder to create a slightly rough texture, which will improve the adhesion of the concrete overlay.
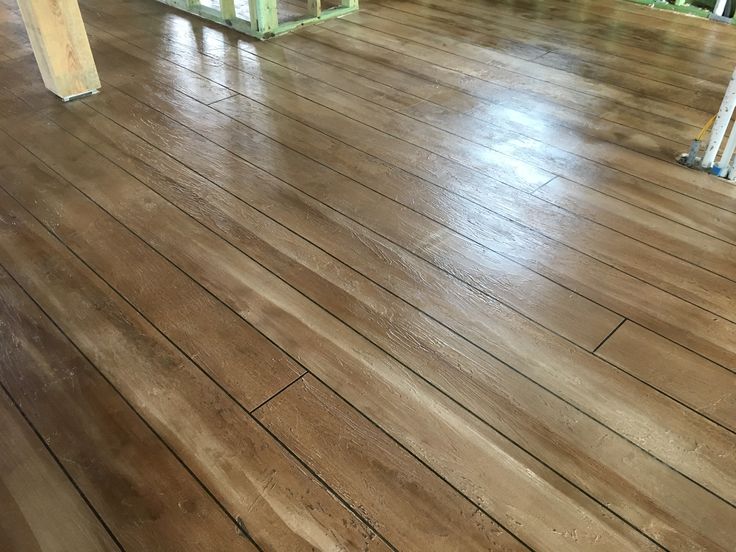
Creating the Wood Grain Texture: Stamping and Staining Techniques
This is where the magic happens! Once your concrete slab is properly prepared, you can begin creating the wood grain texture. Apply a thin layer of concrete overlay to the prepared surface, ensuring it is evenly distributed. While the concrete is still wet, apply the release agent to the stamps or stencils. Carefully position the stamps or stencils on the concrete surface and press down firmly. Use a roller or tamper to ensure even pressure across the entire stamp. Lift the stamps or stencils carefully to reveal the wood grain texture. Repeat this process until the entire floor is stamped. Allow the concrete to cure completely according to the manufacturer’s instructions. Once the concrete is cured, you can begin staining. Apply the concrete stain in thin, even coats, allowing each coat to dry completely before applying the next. Consider using multiple stain colors to create a more realistic and natural wood look. Experiment with different staining techniques, such as dry brushing or ragging, to add depth and dimension to the grain pattern.
Sealing and Protecting Your Concrete Wood Floors
Sealing is the final and crucial step in the concrete wood floors diy process. A high-quality sealer will protect your floors from stains, moisture, and wear, ensuring their longevity and beauty. Choose a sealer that is specifically designed for concrete floors and compatible with your stain. Apply the sealer according to the manufacturer’s instructions, typically in two thin coats. Allow each coat to dry completely before applying the next. Consider using a penetrating sealer for added protection against moisture. For high-traffic areas, you may want to apply a wax coating over the sealer for extra durability and shine. Regularly clean your concrete wood floors with a neutral pH cleaner to maintain their appearance and prevent damage.
The Advantages of Choosing Concrete Wood Floors
Opting for concrete wood floors diy offers a plethora of advantages over traditional flooring options. The most significant benefit is the exceptional durability. Concrete is far more resistant to scratches, dents, and moisture than hardwood, making it ideal for busy households and commercial spaces. The low maintenance requirements are another major draw. Concrete floors are easy to clean and require minimal upkeep, saving you time and money. The cost-effectiveness of concrete is also a significant advantage. Concrete is generally less expensive than hardwood, tile, or other premium flooring materials. The design versatility of concrete allows you to create a wide range of looks, from rustic and traditional to modern and contemporary. Concrete is also an environmentally friendly option, especially when utilizing existing concrete slabs, reducing the need for new materials and minimizing waste.
Unlocking the Beauty and Benefits: A Review of Concrete Wood Floors
After extensive research and analysis, we’ve found that concrete wood floors diy project is an excellent way to enhance any home or business. The unique blend of aesthetics, durability, and affordability makes it a compelling alternative to traditional flooring options. The ability to customize the look and feel of your floors with different stamps, stains, and textures provides endless design possibilities. The low maintenance requirements are a major plus for busy homeowners. However, it’s important to acknowledge some potential drawbacks. Concrete can be cold and hard underfoot, which may not be ideal for everyone. It can also be prone to cracking if not properly installed or maintained. Despite these limitations, the overall benefits of concrete wood floors far outweigh the drawbacks. For those seeking a durable, stylish, and cost-effective flooring solution, concrete wood floors are an excellent choice.
Pros:
- Exceptional Durability: Resistant to scratches, dents, and moisture.
- Low Maintenance: Easy to clean and requires minimal upkeep.
- Cost-Effective: Generally less expensive than hardwood or tile.
- Design Versatility: Allows for a wide range of looks and styles.
- Environmentally Friendly: Can utilize existing concrete slabs.
Cons:
- Can be Cold: Concrete can feel cold underfoot.
- Hard Surface: Can be hard and unforgiving.
- Potential for Cracking: Requires proper installation and maintenance.
Ideal User Profile: Homeowners or business owners seeking a durable, stylish, and cost-effective flooring solution. Particularly well-suited for high-traffic areas and homes with pets or children.
Key Alternatives: Hardwood floors, tile floors.
Expert Overall Verdict: Highly recommended for those seeking a unique and durable flooring option. The design versatility and low maintenance requirements make it a compelling choice for a wide range of applications.
Exploring Different Concrete Wood Floor Styles
One of the most compelling aspects of concrete wood floors diy is the sheer range of design styles you can achieve. From rustic and reclaimed looks to sleek and modern aesthetics, the possibilities are virtually endless. For a rustic vibe, consider using stamps that mimic the appearance of reclaimed wood, complete with knots, cracks, and imperfections. Use a dark stain to enhance the aged and weathered look. For a more modern style, opt for smooth concrete with a subtle wood grain texture. Use a light or neutral stain to create a clean and minimalist aesthetic. You can also experiment with different staining techniques, such as acid staining or dye staining, to achieve unique and vibrant colors. The key is to choose a style that complements your home’s architecture and your personal taste.
Expert Tips for a Flawless Concrete Wood Floor Finish
Achieving a flawless finish with concrete wood floors diy requires attention to detail and a few expert tips. First, always start with a clean and properly prepared concrete slab. This is the foundation for a successful project. Second, use high-quality materials, including concrete mix, stamps, stains, and sealers. Cheap materials can compromise the final result. Third, practice your stamping technique on a small, inconspicuous area before tackling the entire floor. This will allow you to refine your technique and avoid costly mistakes. Fourth, apply the stain in thin, even coats, allowing each coat to dry completely before applying the next. This will prevent streaking and ensure a uniform color. Fifth, seal your floors with a high-quality sealer to protect them from stains, moisture, and wear. Finally, don’t be afraid to experiment with different techniques and styles to create a truly unique and personalized look.
Reflecting on the Beauty and Versatility of Concrete Wood Floors
In conclusion, concrete wood floors diy offer a remarkable blend of beauty, durability, and affordability, making them an increasingly popular choice for homeowners and businesses alike. Their customizable nature allows for a wide range of aesthetic expressions, from rustic charm to modern elegance. The resilience and low maintenance requirements of concrete provide a practical and long-lasting flooring solution. By following the steps and tips outlined in this guide, you can confidently embark on your own concrete wood floor project and transform your space into a stunning and inviting environment. Share your successful concrete wood floor transformations with us in the comments below, or explore our other guides for more home improvement inspiration!
